Showing posts with label wcf. Show all posts

Saturday, June 22, 2013

Access WCF Rest Services from JQuery Part 2

This is the Part 2 of the Post.
You can find Part 1 Here

In this post we'll see how to access the service we created using JQuery.

First we'll see the insert Employee part.
here we are posting the Employee object from  JQuery to WCF, As I'm using IIS Express its localhost you can give your service url correctly.

$.ajax({
 url: "http://localhost:53840/SampleService.svc/insertemployee",
 type: "POST",
 processData: true,
 contentType: "application/json",
 data: '{"Id":1, "Name":"Guru"}',
 dataType: "json",
 crossDomain : true,
 success: function(data) { alert(data) },
 error : function(data){alert('error')}
 
});

In this method we are getting all the employees as a json object array to the client side.
You do more by changing the Uri template and send information to the server side when using GET.

$.ajax({
 url: "http://localhost:53840/SampleService.svc/GetEmployees",
 type: "GET",
 processData: true,
 contentType: "application/json",
 dataType: "json",
 crossDomain : true,
 success: function(data) { alert(data) },
 error : function(data){alert('error')}
 
}); 

Thats it now you can access you service from JQuery.

Download Sample

Please Leave a Comment.

Access WCF Rest Services from JQuery Part 1

Hi Readers, this post is about creating the wcf service that is going to be accessed from jquery,

This service is very simple it allows you to add an employee via POST and retrieve all the employees via GET.
You can learn how to create a GET request and POST request.

As the first step you’ll have to create a WCF service project in Visual Studio (I’m using 2012). Here I’m creating the project as “WCF Rest Sample”.
You can use the Service1 which comes as default but I’ve created a new service called “SampleService” so that it’s easy to understand.

Then create the required classes, the given image shows the project structure.


Lets see the code for each class

The data provider class is used to contain the employee objects, in real world you can use a database as the data source.

public static class DataProvider
{
    private static List<Employee> Employees = new List<Employee>();

    public static List<Employee> GetEmployees()
    {
        return Employees;
    }

    public static void AddEmployee(Employee employee)
    {
        Employees.Add(employee);
    }
}

The next class is our Entity Employee this will be transferred as Json

[DataContract]
public class Employee
{
    [DataMember]
    public int Id { get; set; }

    [DataMember]
    public string Name { get; set; }
}

Then our service contract here the methods are declared and appropriate settings are made to change the request and response to json.

[ServiceContract]
public interface ISampleService
{
    [OperationContract]
    [WebInvoke(ResponseFormat = WebMessageFormat.Json, RequestFormat = WebMessageFormat.Json)]
    int InsertEmployee(Employee employee);

    [OperationContract]
    [WebGet(ResponseFormat = WebMessageFormat.Json)]
    List<Employee> GetEmployees();
}

This is the implementation for the service.

public class SampleService : ISampleService
{
    public int InsertEmployee(Employee employee)
    {
        DataProvider.AddEmployee(employee);
        return 1;
    }

    public List<Employee> GetEmployees()
    {
        return DataProvider.GetEmployees();
    }
}

In the global.asax file only the Begin request method is modified so that the service can be accessed from Firefox and Chrome.

protected void Application_BeginRequest(object sender, EventArgs e)
{
    HttpContext.Current.Response.AddHeader("Access-Control-Allow-Origin", "*");
    if (HttpContext.Current.Request.HttpMethod == "OPTIONS")
    {
        HttpContext.Current.Response.AddHeader("Cache-Control", "no-cache");
        HttpContext.Current.Response.AddHeader("Access-Control-Allow-Methods", "GET, POST");
        HttpContext.Current.Response.AddHeader("Access-Control-Allow-Headers", "Content-Type, Accept, x-requested-with");
        HttpContext.Current.Response.AddHeader("Access-Control-Max-Age", "1728000");
        HttpContext.Current.Response.End();
    } 
}

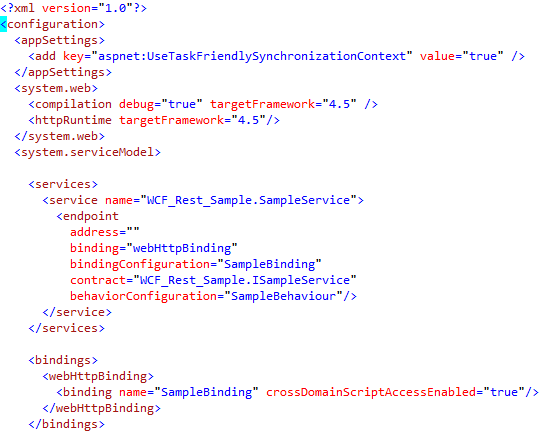
Now you'll have to do the appropriate changes the the web.config to turn the service into REST.

Now you can run the service and see the methods that are available using the help page (Enabled in the Web.config file).


Now our service is ready to be called from JQuery.
The jquery part will be explained in Part 2.

Wednesday, March 27, 2013

Connecting Windows 8 Store Application with SQL Server using WCF - Part 1

Hi Readers This post is about connecting Windows 8 Store application and SQL server using WCF. The Part 1 is about creating the WCF service. First lets create the Database.
CREATE DATABASE LearnerDB;

USE LearnerDB;

CREATE TABLE Students
(
 ID INT IDENTITY PRIMARY KEY,
 FirstName VARCHAR(100),
 LastName VARCHAR(100)
);

INSERT INTO Students VALUES('John','Doe');
INSERT INTO Students VALUES('Mark','Moe');
INSERT INTO Students VALUES('Grace','Goe');
INSERT INTO Students VALUES('Paula','Poe');
INSERT INTO Students VALUES('John','Rambo');
INSERT INTO Students VALUES('Jane','Joe');
 
in Visual Studio 2012 create a WCF service project

Then create a new service called "DataProvider"  (You can use the IService which comes as default as well)


 Let go the coding Part
   [ServiceContract]
    public interface IDataProvider
    {
        [OperationContract]
        Student getStudent(int ID);

        [OperationContract]
        List getStudents();
    }

    [DataContract]
    public class Student
    {
        [DataMember]
        public int ID { get; set; }

        [DataMember]
        public string FirstName { get; set; }

        [DataMember]
        public string LastName { get; set; }
    }
The student class is going to be used as the entity class to represent the table. The actual coding for the Service will be in the DataProvider Class
    public class DataProvider : IDataProvider
    {
        //Get the information of a single student
        public Student getStudent(int ID)
        {
            DataAccess dataAccess = new DataAccess();
            return dataAccess.getStudent(ID);
        }

        //Get information of all students
        public List getStudents()
        {
            DataAccess dataAccess = new DataAccess();
            return dataAccess.getStudents();
        }
    }
The data provider uses the dataaccess class to communicate with the database
public class DataAccess
{
    //Connection to the Database
    SqlConnection DBconnection;

    public DataAccess()
    {
        //Get the connection from the Web config
        string connectionString = ConfigurationManager.ConnectionStrings["DBConnection"].ToString();
        DBconnection = new SqlConnection(connectionString);
    }

    /// Get the information based on Student ID
    public Student getStudent(int ID)
    {
        if (DBconnection.State==ConnectionState.Closed)
        {
            DBconnection.Open();
        }

        Student student = null;

        SqlCommand command = new SqlCommand("select * from students where ID ="+ID,DBconnection);
        SqlDataReader reader = command.ExecuteReader();
        if (reader.Read())
        {
            student = new Student()
            {
                ID = ID,
                FirstName = reader["FirstName"].ToString(),
                LastName = reader["LastName"].ToString()
            };
        }
        return student;
    }

    /// Get a list of all students
    public List getStudents()
    {
        if (DBconnection.State == ConnectionState.Closed)
        {
            DBconnection.Open();
        }

        List students = new List();

        SqlCommand command = new SqlCommand("select * from students", DBconnection);
        SqlDataReader reader = command.ExecuteReader();
        while (reader.Read())
        {
            students.Add(new Student()
            {
                ID = Convert.ToInt32(reader["ID"].ToString()),
                FirstName = reader["FirstName"].ToString(),
                LastName = reader["LastName"].ToString()
            });
        }
        return students;
    }
}
After creating the service you can test it using WCF Test Client.