This service is very simple it allows you to add an employee via POST and retrieve all the employees via GET.
You can learn how to create a GET request and POST request.
As the first step you’ll have to create a WCF service project in Visual Studio (I’m using 2012). Here I’m creating the project as “WCF Rest Sample”.
You can use the Service1 which comes as default but I’ve created a new service called “SampleService” so that it’s easy to understand.
Then create the required classes, the given image shows the project structure.

Lets see the code for each class
The data provider class is used to contain the employee objects, in real world you can use a database as the data source.
public static class DataProvider
{
    private static List<Employee> Employees = new List<Employee>();

    public static List<Employee> GetEmployees()
    {
        return Employees;
    }

    public static void AddEmployee(Employee employee)
    {
        Employees.Add(employee);
    }
}
The next class is our Entity Employee this will be transferred as Json
[DataContract]
public class Employee
{
    [DataMember]
    public int Id { get; set; }

    [DataMember]
    public string Name { get; set; }
}
Then our service contract here the methods are declared and appropriate settings are made to change the request and response to json.
[ServiceContract]
public interface ISampleService
{
    [OperationContract]
    [WebInvoke(ResponseFormat = WebMessageFormat.Json, RequestFormat = WebMessageFormat.Json)]
    int InsertEmployee(Employee employee);

    [OperationContract]
    [WebGet(ResponseFormat = WebMessageFormat.Json)]
    List<Employee> GetEmployees();
}
This is the implementation for the service.
public class SampleService : ISampleService
{
    public int InsertEmployee(Employee employee)
    {
        DataProvider.AddEmployee(employee);
        return 1;
    }

    public List<Employee> GetEmployees()
    {
        return DataProvider.GetEmployees();
    }
}
In the global.asax file only the Begin request method is modified so that the service can be accessed from Firefox and Chrome.
protected void Application_BeginRequest(object sender, EventArgs e)
{
    HttpContext.Current.Response.AddHeader("Access-Control-Allow-Origin", "*");
    if (HttpContext.Current.Request.HttpMethod == "OPTIONS")
    {
        HttpContext.Current.Response.AddHeader("Cache-Control", "no-cache");
        HttpContext.Current.Response.AddHeader("Access-Control-Allow-Methods", "GET, POST");
        HttpContext.Current.Response.AddHeader("Access-Control-Allow-Headers", "Content-Type, Accept, x-requested-with");
        HttpContext.Current.Response.AddHeader("Access-Control-Max-Age", "1728000");
        HttpContext.Current.Response.End();
    }
}
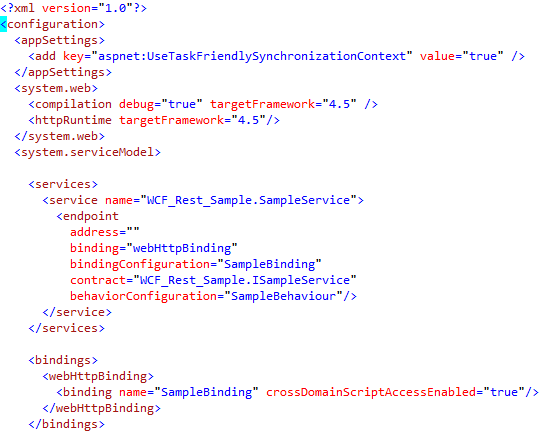
Now you'll have to do the appropriate changes the the web.config to turn the service into REST.

Now you can run the service and see the methods that are available using the help page (Enabled in the Web.config file).

Now our service is ready to be called from JQuery.
The jquery part will be explained in Part 2.
No comments:
Post a Comment