Hi Readers,
This post is on getting started with Passport. Here I'll explain on how to create an API that will support to add users to a datasource and login and logout the user and do authenticated calls.
Here we do bit of dependency injection to make it easier to add any type of dataaccess class so that you can use your own data access class and use your own data source.
When it comes to authentication for Node and Express Passport is a famous NPM package which supports multiple strategies. Here I'll be explaining the local strategy which will use a local data source. there are other options like using facebook or google as the strategy to authenticate the user.
The sample code is shared in the below GIT repository
https://github.com/guruparan/BlogSample/tree/master/NodeAuthAPI
The script files and the usages are explained below
app.js
The main node application which is the startup file for the API, this application runs in port 5000.
authroute.js
The API for authentication which has the below POST methods
http://localhost:5000/auth/signup
creates a user, the user should be provided in the below format
{
"username":"guru",
"password":"123"
}
http://localhost:5000/auth/login
Authenticates a user, the request is same as above.
http://localhost:5000/auth/logout
A direct post to the server, will logout the user
loginstrategy.js
The strategy for validating the user, will query the database and check whether its a valid login.
passportauth.js
Setup Passport to store and retrieve the user from the session.
userdataaccess.js
Used to access the datastore to create and verify users. Here mongoose and mongo db is used to store users.
The code is commented to make it more understandable.
Just download and run the below commands to try out the sample API.
npm install
npm start
Happy Coding.
Guru
Thursday, December 28, 2017
Tuesday, November 28, 2017
EF Core 2.0 Scaffolding existing Database
Hello Readers,
This post will be on using the scaffolding mechanism to create the DB Context and model classes for the existing databases.
Whenever we start projects we come up with requirements to modify existing components, based on the requirement and the expertise we choose our paths.
Most of the time the databases are already there so we go with DB first approach to create the context.
When it comes to EF Core this option is available there as well but will include a bit of command line work.
This article will explain a way to create a DB Context from an existing database by selecting only specific tables in EF Core.
The commands are pretty straight forward you just have to install some Nuget packages and run a command to generate the context and the classes to represent the tables.
The first set of commands will be used to install the packages.
Have these things in mind
If you are creating a library (.NETStandard) to do all your data access works and a references is not added to the startup project you will get the below error. That is if you choose the .NETStandard project as the startup.
Startup project '{project name}' targets framework '.NETStandard'. There is no runtime associated with this framework, and projects targeting it cannot be executed directly. To use the Entity Framework Core Package Manager Console Tools with this project, add an executable project targeting .NET Framework or .NET Core that references this project, and set it as the startup project; or, update this project to cross-target .NET Framework or .NET Core.
If you are using a .NET Core library without adding a reference and run the scaffold command you will get the below error.
Unable to find provider assembly with name Microsoft.EntityFrameworkCore.SqlServer. Ensure the specified name is correct and is referenced by the project.
Always remember to set your class library as the startup project when running the scaffold command.This will reduce unwanted errors.
The command to scaffold is below.
Tables are a string array that you have to specify
You can use the -Force command when updating or adding tables
The verbose flag will provide you additional information and will help you when you have errors.
References
https://docs.microsoft.com/en-us/ef/core/miscellaneous/cli/powershell
Happy Coding
-Guru-
This post will be on using the scaffolding mechanism to create the DB Context and model classes for the existing databases.
Whenever we start projects we come up with requirements to modify existing components, based on the requirement and the expertise we choose our paths.
Most of the time the databases are already there so we go with DB first approach to create the context.
When it comes to EF Core this option is available there as well but will include a bit of command line work.
This article will explain a way to create a DB Context from an existing database by selecting only specific tables in EF Core.
The commands are pretty straight forward you just have to install some Nuget packages and run a command to generate the context and the classes to represent the tables.
The first set of commands will be used to install the packages.
Install-Package Microsoft.EntityFrameworkCore.Design
Install-Package Microsoft.EntityFrameworkCore.SqlServer
Install-Package Microsoft.EntityFrameworkCore.sqlserver.Design
Install-Package Microsoft.EntityFrameworkCore.Tools
Have these things in mind
If you are creating a library (.NETStandard) to do all your data access works and a references is not added to the startup project you will get the below error. That is if you choose the .NETStandard project as the startup.
Startup project '{project name}' targets framework '.NETStandard'. There is no runtime associated with this framework, and projects targeting it cannot be executed directly. To use the Entity Framework Core Package Manager Console Tools with this project, add an executable project targeting .NET Framework or .NET Core that references this project, and set it as the startup project; or, update this project to cross-target .NET Framework or .NET Core.
If you are using a .NET Core library without adding a reference and run the scaffold command you will get the below error.
Unable to find provider assembly with name Microsoft.EntityFrameworkCore.SqlServer. Ensure the specified name is correct and is referenced by the project.
Always remember to set your class library as the startup project when running the scaffold command.This will reduce unwanted errors.
The command to scaffold is below.
Scaffold-DbContext "Server=localhost;Database=DEVDB;User Id=user1;Password=test;" Microsoft.EntityFrameworkCore.SqlServer -Context DBContext -Tables "Employee","Address" -Verbose
Tables are a string array that you have to specify
You can use the -Force command when updating or adding tables
Scaffold-DbContext "Server=localhost;Database=DEVDB;User Id=user1;Password=test;" Microsoft.EntityFrameworkCore.SqlServer -Context DBContext -Tables "Employee","Address","WorkLocation" -Verbose -Force
The verbose flag will provide you additional information and will help you when you have errors.
References
https://docs.microsoft.com/en-us/ef/core/miscellaneous/cli/powershell
Happy Coding
-Guru-
Sunday, February 12, 2017
Beginner's Guide to Angular 2 + WebApi
Hello Everyone,
 There are two WebApi controllers built using the above entities one for brands and one for models.
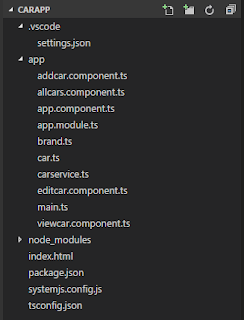
Now lets move on to the Angular 2 front end, the image below shows the file structure in VS code.
This post is an initial guide for anyone who wants to use Angular 2 to access a .Net WebApi back end to access SQL server database.
This will guide you to do the basic CRUD operations using the WebApi REST service.
Now lets see our requirement.
We have Brands and Models for cars which is having a one to many relationship where one brand will have more than one model. We will be doing the CRUD operations on the models and brands will be inserted directly to database. The image below shows the EF model of our database.

Now lets move on to the Angular 2 front end, the image below shows the file structure in VS code.
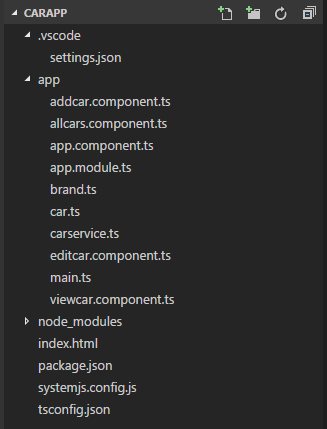
As you can see we have five component classes each will be representing an user interface except the app.component.ts which will be used as the frame for navigation and other component content will be loaded into this component as this is single page application.
We have a carservice.ts which will be interacting with the WebApi.
There are two classes Car and Brand representing our entities in the backend these will be used to when we send and receive data to the service.
The other files are the default set of files in Angular 2 project, here is brief description of each file.
Now lets move on to our user interface of listing the cars.
 You can see the code for this component class in the below URL.
https://github.com/guruparan/BlogSample/blob/master/AngularSample1/CarApp/app/allcars.component.ts
If you can see the code here we request all the cars from the carservice class and display it.
Delete option is also added to the same view where a method is called when the delete button is clicked.
The next screen will be the add new car screen

We have a carservice.ts which will be interacting with the WebApi.
There are two classes Car and Brand representing our entities in the backend these will be used to when we send and receive data to the service.
The other files are the default set of files in Angular 2 project, here is brief description of each file.
| tsconfig.json | Specifies the root files and the compiler options required to compile the project |
| systemjsconfig.js | Allows to configure SystemJS to load modules compiled using the TypeScript compiler. |
| package.json | Used by NPM installer to install the packages |
| app.module.ts | Defines AppModule, the root module that tells Angular how to assemble the application. |
Now lets move on to our user interface of listing the cars.

https://github.com/guruparan/BlogSample/blob/master/AngularSample1/CarApp/app/allcars.component.ts
If you can see the code here we request all the cars from the carservice class and display it.
Delete option is also added to the same view where a method is called when the delete button is clicked.
The next screen will be the add new car screen

Here we have a drop down of brands which will be loaded when the page loads and we will be redirecting to all cars page when the new car is saved.
You can see the code for this component in the below URL.
https://github.com/guruparan/BlogSample/blob/master/AngularSample1/CarApp/app/addcar.component.ts
The next screen will be edit item,
 As you can see the url of the browser it bring in the parameter Id of the car which will be used by to retrieve the car of that id and load the values, other than that this screen is same as the add car screen.
You can see the code for this component in the below URL.
https://github.com/guruparan/BlogSample/blob/master/AngularSample1/CarApp/app/addcar.component.ts
The next screen will be edit item,

You can see the code for this component in the below URL.
https://github.com/guruparan/BlogSample/blob/master/AngularSample1/CarApp/app/editcar.component.ts
The next screen will be view item.
 Again this screen is simple and does not have any actions, it receives the data from the service just like the edit screen using the parameter that is passed via the URL.
https://github.com/guruparan/BlogSample/blob/master/AngularSample1/CarApp/app/editcar.component.ts
The next screen will be view item.

You can see the code for this component in the below URL.
https://github.com/guruparan/BlogSample/blob/master/AngularSample1/CarApp/app/viewcar.component.ts
The most important class of all is the service class and it handles all the requests to the service.
You can see the code for the service class in the below URL.
https://github.com/guruparan/BlogSample/blob/master/AngularSample1/CarApp/app/carservice.ts
Developer Note:
1. This is not 'THE' way to do this but this is also an approach to get started.
2. The templates can be moved to separate html files but kept in the component
3. Bootstrap is used for styling , style can be added separately per component .
4. You can use any other service technology to try this out.
The whole code including the WebApi service can be obtained in the below repository.
https://github.com/guruparan/BlogSample/tree/master/AngularSample1
Happy Coding
-Guru-
Subscribe to:
Posts (Atom)