This post is an initial guide for anyone who wants to use Angular 2 to access a .Net WebApi back end to access SQL server database.
This will guide you to do the basic CRUD operations using the WebApi REST service.
Now lets see our requirement.
We have Brands and Models for cars which is having a one to many relationship where one brand will have more than one model. We will be doing the CRUD operations on the models and brands will be inserted directly to database. The image below shows the EF model of our database.

Now lets move on to the Angular 2 front end, the image below shows the file structure in VS code.
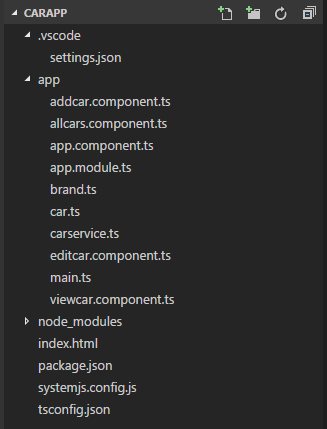
As you can see we have five component classes each will be representing an user interface except the app.component.ts which will be used as the frame for navigation and other component content will be loaded into this component as this is single page application.
We have a carservice.ts which will be interacting with the WebApi.
There are two classes Car and Brand representing our entities in the backend these will be used to when we send and receive data to the service.
The other files are the default set of files in Angular 2 project, here is brief description of each file.
Now lets move on to our user interface of listing the cars.
 You can see the code for this component class in the below URL.
https://github.com/guruparan/BlogSample/blob/master/AngularSample1/CarApp/app/allcars.component.ts
If you can see the code here we request all the cars from the carservice class and display it.
Delete option is also added to the same view where a method is called when the delete button is clicked.
The next screen will be the add new car screen

We have a carservice.ts which will be interacting with the WebApi.
There are two classes Car and Brand representing our entities in the backend these will be used to when we send and receive data to the service.
The other files are the default set of files in Angular 2 project, here is brief description of each file.
| tsconfig.json | Specifies the root files and the compiler options required to compile the project |
| systemjsconfig.js | Allows to configure SystemJS to load modules compiled using the TypeScript compiler. |
| package.json | Used by NPM installer to install the packages |
| app.module.ts | Defines AppModule, the root module that tells Angular how to assemble the application. |
Now lets move on to our user interface of listing the cars.

https://github.com/guruparan/BlogSample/blob/master/AngularSample1/CarApp/app/allcars.component.ts
If you can see the code here we request all the cars from the carservice class and display it.
Delete option is also added to the same view where a method is called when the delete button is clicked.
The next screen will be the add new car screen

Here we have a drop down of brands which will be loaded when the page loads and we will be redirecting to all cars page when the new car is saved.
You can see the code for this component in the below URL.
https://github.com/guruparan/BlogSample/blob/master/AngularSample1/CarApp/app/addcar.component.ts
The next screen will be edit item,
 As you can see the url of the browser it bring in the parameter Id of the car which will be used by to retrieve the car of that id and load the values, other than that this screen is same as the add car screen.
You can see the code for this component in the below URL.
https://github.com/guruparan/BlogSample/blob/master/AngularSample1/CarApp/app/addcar.component.ts
The next screen will be edit item,

You can see the code for this component in the below URL.
https://github.com/guruparan/BlogSample/blob/master/AngularSample1/CarApp/app/editcar.component.ts
The next screen will be view item.
 Again this screen is simple and does not have any actions, it receives the data from the service just like the edit screen using the parameter that is passed via the URL.
https://github.com/guruparan/BlogSample/blob/master/AngularSample1/CarApp/app/editcar.component.ts
The next screen will be view item.

You can see the code for this component in the below URL.
https://github.com/guruparan/BlogSample/blob/master/AngularSample1/CarApp/app/viewcar.component.ts
The most important class of all is the service class and it handles all the requests to the service.
You can see the code for the service class in the below URL.
https://github.com/guruparan/BlogSample/blob/master/AngularSample1/CarApp/app/carservice.ts
Developer Note:
1. This is not 'THE' way to do this but this is also an approach to get started.
2. The templates can be moved to separate html files but kept in the component
3. Bootstrap is used for styling , style can be added separately per component .
4. You can use any other service technology to try this out.
The whole code including the WebApi service can be obtained in the below repository.
https://github.com/guruparan/BlogSample/tree/master/AngularSample1
Happy Coding
-Guru-
https://github.com/guruparan/BlogSample/blob/master/AngularSample1/CarApp/app/viewcar.component.ts
The most important class of all is the service class and it handles all the requests to the service.
You can see the code for the service class in the below URL.
https://github.com/guruparan/BlogSample/blob/master/AngularSample1/CarApp/app/carservice.ts
Developer Note:
1. This is not 'THE' way to do this but this is also an approach to get started.
2. The templates can be moved to separate html files but kept in the component
3. Bootstrap is used for styling , style can be added separately per component .
4. You can use any other service technology to try this out.
The whole code including the WebApi service can be obtained in the below repository.
https://github.com/guruparan/BlogSample/tree/master/AngularSample1
Happy Coding
-Guru-


